Sunday, December 18, 2011


HAPPY BIRTHDAY, JESUS!!!

Thanks for joining us for our Happy Birthday Jesus Blog Hop. Today, we are worshiping the King & celebrating the TRUE REASON FOR THE SEASON! This Hop is Hosted by Tina from Crafty and Green. If you've hopped along from The Fantastic Kari, then you are in the right place!! If you are just joining me from your dashboard, or reading this via email, please be sure to start at the beginning with Tina (We wouldn't want you to miss a THING!!)

Thank you for Celebrating with us Today! In the midst of all the hustle and bustle of the Holidays, We have to remember the one we really celebrate and love and who is the TRUE REASON FOR THE SEASON! Jesus Christ our Lord and Savior.

BLOG CANDY:

There is TONS of Great Candy in this Hop. We have 7 Sponsors for this hop with FANTASTIC PRIZES!!!!
1. Jen's Digi Stamps - http://www.jensdigistamps.com/ (Gift Certificate)
2. Michelle's Scrapbooking & More- http://michellescrap.com/ (Gift Certificate)
3. Heather Flaherty w/ {ippity} - http://www.iheartippity.com/ (Gift Certificate)
4. Papercrafting World - www.papercraftingworld.com (Gift Certificate)
5. Scraptastical Kreations- http://scraptasticalkreations.com/ (Gift Certificate)
6. K Andrews Designs- http://www.kandrewdesigns.com/ (Stamp Set)
7. My Family Keepsakes- http://myfamilykeepsakes.com/ (12x12 print/page)

What You Have to Do To Be in the Running for these Fabulous Prizes:

1. The Ladies have all worked hard on their Projects, Please Comment on Every Stop Along the way on Both Days. (Separate Line up December 17th & 18th)
2. Please Become a Follower of CraftyAnd Green (http://craftyandgreen.blogspot.com)


My favorite part of the Christmas Story is when the angel visits the shepherds: 
"And, lo, the angel of the Lord came upon them, and the glory of the Lord shone round about them: and they were sore afraid.
For unto you is born this day in the city of David a Saviour, which is Christ the Lord.
And this [shall be] a sign unto you; Ye shall find the babe wrapped in swaddling clothes, lying in a manger.
And suddenly there was with the angel a multitude of the heavenly host praising God, and saying,
Glory to God in the highest, and on earth peace, good will toward men."
(Luke 2:9-14 KJV)

Keeping this angel in mind, my favorite Christmas craft is always to make those near and dear to me an angel pin to wear as a reminder of that wonderful night!  I hope you enjoy!


 Here are the supplies you need to make these (and don't forget the hot glue and the pin for the back!):


It's really quite simple; each angel can be made from 1/2 of a gold pipe cleaner.  You first fold the end of the pipe cleaner to make a "knot" that the beads won't slip off of. Then, you slide down 3 large paddlewheel beads and then 4 small paddlewheel beads.  With what's left of the pipe cleaner, cut it in half to get the small piece you see in the picture above.  That will be for your arms:  fold the end of the small pipe cleaner piece to form a "knot" and apply 6 small round beads.  Make the "knot" at the other end of the pipe cleaner; you should have about a half-inch to inch leeway.  Spread the beads 3 and 3 with the bit of leeway in between and then wrap around the pipe cleaner sticking up from the angel's "body" to form the arms.  After attaching the arms, slide a large round bead down the pipe cleaner to make the head.  The leftover pipe cleaner at the top is to be bent over and rounded to form the halo of the angel (I have found that wrapping it around a round pencil works best).  Last, but not least, hot glue the wings and pin on the back and, VOILA!, a beautiful angel to remind you of the blessings bestowed upon us that wonderful Christmas night so long ago!

And, just for your listening pleasure, this is a cool song I've recently discovered that makes saying "Merry Christmas" COOL again! :)


Now, Hippity Hop on over to Judith To see her Fabulous Creation Today!

Friday, October 21, 2011

My Cricut Craft Room's Festive Friday

Welcome to Festive Friday!!!!!  Cricut Craft Room has all sorts of fabulous holiday fun going on today!! Don't forget to go over there and see it all!!!


I chose to do Halloween today, as it is coming up and I needed to make something for my son's class, so this is what I came up with:


For this cute little treat bag, I just used some small treat bags I found at Hobby Lobby and some basic black, orange and white cardstock from my stash.  The ribbon is also from Hobby Lobby.  For the topper itself, I cut a 4"x 4.5" rectangle using my Plantin Schoolbook cartridge and black cardstock.  Then, I scored it halfway along the 4.5" side and folded it; after that, I cut a small rectangle out of the middle (two slits) to fold backward to form a pencil holder.  Then, I wrapped the ribbon around the bottom of it and attached it using glue dots.  For the decoration, I cut a 2.25" scallop circle from  Accent Essentials out of white cardstock (the Shift key of accent31) and a 2.75" out of orange.  On the white, I stamped a candy corn from some stamps in my stash and colored it with some Copic markers I won from Erica (thank you, Erica!!)  Then I stamped the "Trick or Treat" from another stamp stash over the coloring.  After that, I mounted the white scallop on the orange with some foam strips and then mounted the whole thing on the black with more foam strips.  Then, I stapled the whole thing to the treat bag.  Note:  staple the black rectangle part BEFORE attaching the decoration in the middle.....would just be easier. :)

This is a very simple Halloween project, but I tried something new - coloring with my Copics - so I'm happy with myself.  And, I think the kids will love this as well: they get candy AND a pencil and erasers. :)

I hope you've enjoyed my project and, again, don't forget to go by My Cricut Craft Room to see all the Festive Friday projects the Design Team has going on!

Sunday, October 2, 2011

My Cricut Craft Room's 100 Cartridge Blog Hop, Day 2

Welcome to My Cricut Craft Room's monthly 100+ Cartridge Blog Hop!  You should have arrived from Rosa's blog.  If you just happened across my blog, please go to My Cricut Craft Room to begin at the beginning. 

My first project for today is an Angry Birds card!!  I was soooo excited to find some instructions on how to make an Angry Bird! :)  But, the instructions I had are for using Stampin' Up's punches (which are $16.95 each and out of my price range right now), so I figured out a way to make it with my Cricut and Plantin Schoolbook cartridge. Here's what my Gypsy screen looked like:

And my mat (I wanted to show you that I really DO use scraps to make these little pieces - see the red??):


All of this was to make the Red Bird:

Using Plantin Schoolbook, I made circles:  two at 1.5" and one at 1.25".  I overlapped the 1.25" one on one of the larger circles to get the tummy cut-out of the bird.  I cut the solid 1.5" circle out of gray cardstock and the overlapped ones out of red.  Then, I picked the rectangle and set my sizes to 0.25" wide and 1" or 2" long.  These were cut out of black and red cardstock, as they were to serve as eyebrows and feathers.  Truth be told, I just trimmed them to the length I needed after the fact and I also had to trim them width-wise, too, as the 0.25" width as too wide, but I was afraid to try to cut it any thinner on the Cricut.  The beak was a square cut at 0.41" out of gold cardstock and I just drew the diagonal in with a black gel pen.  Then, the eyes.  I cut two circles out of white cardstock at 0.38" and two black circles at 0.25".  Piecing him together is a matter of you just looking at a picture and making him look as mad as you want... :)

Now, on to the rest of the card:  the pig and the grass.  Here's my Gypsy screen from that:

I just used the grass that comes on Plantin Schoolbook and cut it to fit the length of a 5"x6.5" card and out of kelly green cardstock.  For the pig, I used another 1.5" circle and attached two little 0.25" ovals for ears and welded them together; this I cut out of lime green cardstock.  Then I made another oval that was 0.74" high out of lighter green cardstock for the snout.  The eyes are 0.25" white circles with black dots drawn in.  (I also drew in the nostrils on the snout and the mouth with a gel pen.) I pieced together the pig and then made the cardfront: I popped the grass up on 3-D foam strips and "hid" the pig behind it.  Then, I attached the Red Bird to one of my homemade wobbles and placed him up in the sky.  For the sky,  I just dabbed Tim Holtz Distress Ink in Tumbled Glass around a scrap scallop circle I had to make a cloud effect (got this from the Stampin' Up lady's video, so don't go thinking I went all genius or anything :D ).

For the sentiment on the inside, I used Everyday Pop-Up Cards.  I cut the Pop-up of the "Good Luck" out of the lighter green cardstock and folded it along the scores to attach to the inside.  Truthfully, I think I did something wrong, because it doesn't look like what I pictured it doing, but....it works, so I can't ask for more than that. :)  Here is the finished project:


Is this not the cutest thing for the Angry Birds fans in your life?!?!

Now for my second project:  a card made for a friend that needs a "lift".....I used Inspired Heart cartridge to make this card:


I first found the cross shape that I wanted, then I took its "background" image and placed two of them on the mat (on my Gypsy). I flipped one of the background images, then lined them up and welded them together to make the card.  They are cut at 6.89" high.  Then, I cut the card out of plain white cardstock.  Next, I cut out the cross image at the same height, using some purple metallic cardstock I had from Target (I believe it's Wausau Paper).  I traced the cross pattern on the white card and then colored in the "windows" like stained glass using Sharpies.  Then I layered on the cross and made my stained glass window front.  For the inside, I copied a Bible verse:
"Thy word is a lamp unto my feet, and a light unto my path."
Psalm 119:105
I printed the verse on plain white paper and then used the template left behind of the card to "stage" where to place the paper for cutting.  When I cut it out (as the card again), I glued it inside the card.  I will put a hand-written sentiment on the other side.
I hope you have enjoyed my projects today; my sincere apologies for the crazy timing of my posts.....Now, on with the Blog Hop!!!
Your next stop is Lisa Newton-Orensky


Here is the entire line up, in case you get lost:


Lisa Newton-Orensky - http://allmadebylisa.blogspot.com

Sunday, September 25, 2011

Card Creating Sunday

It's Card Creating Sunday over in My Cricut Craft Room!!!!  We LOVE making cards!!  If you've just happened across my blog, thanks for stopping by and welcome, but remember to go over to My Cricut Craft Room to see all of the other wonderful cards that were made for today.

This has been a whirlwind of a week - lots of birthdays this week!  In light of that, today's card is actually the card I gave my Dad for his birthday on Friday.  I hope you enjoy!

I started off with a standard, white 5"x6.5" card and overlaid the front with some birthday paper I bought at Hobby Lobby the other day.  (Celebrations 6"x12" paper pack)  Then, I wanted something birthday and cute, but not TOO girly or childish, as it WAS for my Dad, after all. :)  Here is what I came up with:


I used the cupcake from Doodlecharms for this card and I cut it and its layers out at 4.88" on my Gypsy.  I cut the base layer and some sprinkles out of plain blue cardstock; the icing out of lime green plain cardstock; the shadow, flame and some sprinkles from plain yellow cardstock; the candle and some more sprinkles out of plain red cardstock.  All of this cardstock just came from my stash.  I layered the cupcake together, but wanted some dimension, so I put the cupcake on some foam to attach it to its shadow.  I also wanted the candle flame to stand out, since it was the same color as the shadow, so I inked the edges of it with Barn Door colored Tim Holtz Distress Ink.  The sentiment on the inside is a stamp I had in my stash and I used Tim Holtz Distress Ink in Tumbled Glass for the color.

Then came the fun part!!! I have fallen in love with the idea of Action Wobbles, but they are sold out of them online (plus they're expensive!).  So, I made my own! I used two 1" circles (I finally got me a punch so these are quick and easy) and a small coil of 26-gauge wire.  Take just enough wire to wrap around your cylinder (I use my Zig 2-way Glue Pen since it's bigger around) one full wrap and a couple of half wraps.  Tape the ends of the coil, one to each of the circles, and then use a glue dot to secure the wobble to the card and the cupcake.  Easy peasy!  Here's a quick clip of the wobble in action:


I hope you have enjoyed my Dad's birthday card as much as we did!  I know I had fun making it! :)

Have a great rest of your weekend! And, now, Happy Birthday to me!! :D

Tuesday, September 20, 2011

My Cricut Craft Room's Card Creating Tuesday

It's Card Creating Tuesday over in My Cricut Craft Room!! Yay!! It's one of our (the Design Team's) favorite days!!  If you just happened across my blog, thank you for visiting and welcome to my crafty world!  Also, please don't forget to stop by My Cricut Craft Room for some more wonderful inspiration!!  If you came from My Cricut Craft Room, welcome!

For today, I made two very simple cards using Damask Decor.  Who knew a card called "Damask Decor" would have holiday cards built right in????  By the way, these can be "dressed up" in any way you can think of.....I am just not that great at the "dressing up" of it all, so I did what I could with the papers and all that I chose...

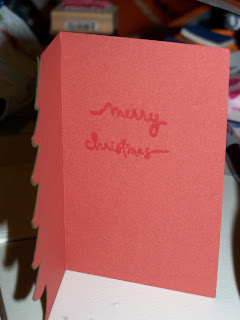
My first card is a Christmas card....it uses the tree card and layer from p. 70 of the handbook.  I cut both at 4.65" (I use my Gypsy for everything, so you can use just the cart in your machine at 4.5" or 4.75").  For the card, I used a burgundy cardstock and the tree is a dark olive green.  Both of these are just plain cardstock from my stash.  My mind's eye tells me that the tree needs some "decorating" but I am at a loss right now as to how....maybe you guys can help! Comment away on how I can "decorate" my Christmas tree!!  The inside is stamped with a little "Merry Christmas" sentiment I've had on hand for years and the ink is Tim Holtz Distress Ink in Barn Door (I liked the kind of watermark effect it had).


My next card is a Halloween card, or could just be done as a fall card. :)  Again, I used Damask Decor, the Pumpkin card feature and its layer - page 68 in the handbook.  I cut both of these at 4.41" (again, using the Gypsy...if you're using just the machine and cartridge, you can use 4.5").  The card base is just basic black cardstock from my stash and the pumpkin is an orange metallic cardstock from a package that I picked up at Target a few years ago. I believe the paper company is Wasau Paper.  For the inside of the card, I decided to try something I've been a little hesitant to try: embossing!!!  OK; so it didn't turn out quite like I wanted it to, but at least I tried something new!  The sentiment is a stamp I picked up on a clearance aisle a long time ago, and I used Stampendous! embossing powder called Star Dust - a lovely gift from Erica of My Cricut Craft Room herself (THANKS!!).  Note to self: if the embossing powder says "Transparent," you need to use a color underneath it if you want it to really show up on black. LOL  I probably should have stamped it in white before I embossed, but I tried just the embossing powder alone.  Not too terrible, but not too visible, either.  Oh, well, you live and learn, right???  Without any further adieu, here is the Pumpkin Card:


I hope you've enjoyed my creations today; keep checking back, as we have projects going on ALL the time!!! Also, remember to check My Cricut Craft Room daily, as she has new things going EVERY DAY!!!!  (PPPPSSSSTTTT: she's also very fond of giveaways, so be sure to watch for those!)


Have a fantastic day, and remember to stay crafty!


Friday, September 16, 2011

Festive Friday over at My Cricut Craft Room!!


It's Friday!!!! And, you know what that means:  it's Festive Friday over at My Cricut Craft Room!!!  Festive Friday is when we, the Design Team, make creations based on the holidays!  This can be Christmas (our fave!), Halloween, Easter, Hannukah, Fourth of July....any holiday!  For this go-round, I chose to do Christmas, as it is fast approaching, and you can never get going too early.  I hope you enjoy my little cards!

If you just happened upon my blog, GREAT! Welcome!  But, don't forget to head over to My Cricut Craft Room to see yet more wonderful ideas to help you keep your holidays merry and bright!

For both of these cards, I used Doodlecharms.  I just put the blackout of the reindeer and Santa on my mat (on my Gypsy - I use it for EVERYTHING), then copied them and flipped them. I then arranged the images so I could weld them together to make my card base.  Both the Santa and the reindeer were cut at 4.06". The cards came out to be fairly small, but they're cute and will fit in an A2 envelope. :)  I cut Santa from white cardstock and the reindeer from a light brown cardstock, both from my stash.  Here is what my Gypsy screen looked like for this step:


Next, I put in a second layer (you can see Layer 1 and Layer 2 tabs on the image above) for the "features" of Santa and the reindeer.  I used the layers on the cartridge/buttons and arranged them on the mat so I could cut them all at once.  I had to use the Hide feature so I could cut out certain pieces in certain places.  Here is the Gypsy screen for that:

(you can see where the hidden parts of the pictures are - they are the lighter gray lines)

I love doing things this way, as I can use small pieces of cardstock (or even scraps if they're big enough!) and arrange them on my mat and get all pieces cut at once.  Saves a LOT of time!  Let's see.....I used the light brown cardstock from my base for the full reindeer, dark brown for the reindeer face, white for the Santa beard/mustache/etc., a fleshy colored beige for Santa's face and red for the hat and noses.  All were just cardstock from my stash, and all were cut at 4.06" to match the card bases.  I used my Zig 2-way Glue Pen for all of my layering.

Here is the finished product, after all my layering (which sometimes leaves a LOT to be desired LOL):


So, you can see from the Gypsy screen that I hid the eyes on both Santa and the reindeer....that was so I could add the googly eyes! Aren't they cute?!?  Then, I decided the reindeer needed personality, so I added red glitter glue (Studio G from the dollar bin at Michael's) for his nose and turned him into Rudolph!  Santa needs something "extra" too, but I don't have any embossing skills or white flocking, so that will have to wait a bit. :)  I want to flock his hat trim and ball and possibly either flock or emboss his beard and mustache.  I'm thinking the beard and mustache would be neat fuzzy, but also that they need a little sparkle....I just can't decide. Maybe you can help me decide with your comments......... :D   The sentiments inside the cards are just stamps from my various treks into Michael's or Hobby Lobby. For the Rudolph, I used a Martha Stewart red ink and for Santa, Tim Holtz Distress Ink in Barn Door.

I hope you've enjoyed my little creations; hope you leave some feedback and/or become a follower!  I love feedback and new followers!!! One day, I will be able to do a giveaway on here for those who have joined me on this wild adventure!  Have a great rest of your day, and I hope you all have a very Merry Christmas! :)

Wednesday, September 14, 2011

My Cricut Craft Room's Would You Ever Guess Wednesday


It's Wednesday, and you know what that means!!!! It's Would You Ever Guess Wednesday over at My Cricut Craft Room!!!! If you came here from there, you are in the right place! If you just happened upon my blog, then please be sure to visit My Cricut Craft Room to see all of the wonderful creations Erica's Design Team made for today!

What exactly IS Would You Ever Guess Wednesday? Well, it is a day in which we, the Design Team, make a project using only the feature keys of our cartridges, or make a paper creation with a Cricut Cake cartridge.  We would just like for you to take a second look at all those wonderful Cricut cartridges and see what ELSE they can do for you and your paper crafting!

Now, on to my project for today.  It is very simple, as is most of what I do, just because I am a time-crunched single mom to an 8-year-old little boy and haven't had a whole lot of time lately to learn some of the "better" techniques.  I am determined to learn some, though! :) 

If you have been to my blog before, you know my cousin is getting married soon.  Well, she and her fiancee and her daughter have found a new house and I wanted to make them a "congrats on the new house card".....so, this is what I came up with:


I created this little card using.......Would you EVER guess: Create A Critter!!! Yes, Create A Critter! This is a cute little house that can be found using the Accessories button!  I believe it's supposed to be a birdhouse or doghouse, but it makes a cute "Congrats" card as well!  To find this cute little house, it is the second key from the left on the bottom row of your keyboard.  The "critter" is a bird, and the "Accessory" is the house. The Shift Key (while still in Accessory mode) will get you the heart and roof.

When I first started this project, I wanted to turn this little house into a shape card, so I put two houses, at 4.06", on my Gypsy, flipped one and welded them together at the point of the roof.  In reality, it was a VERY flimsy card when it came out.  So, I just glued the "card" shut to make a more stiff front, and then cut out a second "card" to glue together to make a stiff back. :)  I scored the back house about 1-1.5" from the point of the roof so as to provide a way for the card to open and just glued the back to the front using the top 1-1.5" of the roof (the little triangle there).  The house itself was just beige plain cardstock from my stash. For the roof, I used brown cardstock and ran it through my Cuttlebug with the Argyle folder to look like some roofing tiles.  The heart was just plain hot pink cardstock.  All of these were cut at the same size as the house, 4.06". I just used a "Congrats!" stamp from my stash and Tim Holtz Distress Ink (Vintage Photo) for the sentiment on the front.  The inside is just hand-written with a brown Sharpie. When cutting the roof and the heart, though, they come together on the button, so you may wonder how I got them to be two different colors without wasting a whole lot of paper....

Here's how:


I use my Gypsy for just about EVERYTHING and this is why.  You can see on the left how I welded the two houses together.  Then, for the roof and the heart, I put that button on my mat twice, and used the Hide Feature to hide the heart on the top and the roof on the bottom (you can see how the "hidden" parts are a lighter gray on the screen).  That way, I can use smaller pieces of cardstock (scraps even!) and get all of my cuts at one time, rather than feeding through a sheet at a time for several cuts, and getting things like brown hearts and pink roofs. :)  I DO have access to Cricut CraftRoom (CCR) now, but my computer and my Cricut are never in the same vicinity, so even if I use CCR, I still transfer it to my Gypsy for the final cutting.


OK, so that's it for the cute little Congrats card I made for my cousin; it is very simple, but I hope you like it nonetheless!  I sure enjoyed my "time out" while making it!  Be sure to stop by again soon to see what else I have created!  Also, don't forget to go over to My Cricut Craft Room to see what all else the DT is up to these days!  Erica has also gotten her webstore up and running, so you can go see what wonderful deals she has on Cricut cartridges and accessories as well as some wonderful products and papers from Imaginesce, BoBunny and more!!

Catch you later!!!!

Saturday, September 3, 2011

My Cricut Craft Room's 100 Cartridge Blog Hop!


It's that time of the month again......no, not THAT time!! Heehee.... Anyway, it's time for My Cricut Craft Room's 100 Cartridge Blog Hop!!! I am still so excited to be a part of this Design Team and show you what I have created! Not to mention, all of my fantabulously talented co-designer's creations!! You KNOW they're AWESOME!!!!!

You should have come from Erica's Surprise Giveaway Page....if not, head back over to My Cricut Craft Room so you can begin at the beginning (the best thing, right???) and see ALL of the wonderful creations for today!

First up for this weekend's hop, I made a cute little scrapbook page that would be suitable for any trip to the zoo; mine was just made with a particular place in mind - the Wild Animal Safari in Pine Mountain, GA. We LOVE that place!  Here it is:

The page is a little busy, but that's part of it's charm, for  me. The Park is busy, too, so it works.....  The background paper is from a pack of safari-themed paper I picked up at Big Lots for $7 (see my previous post of the monkey card for the name) and has glitter for an extra "pop". The title is cut from Mickey Font at 1" out of plain brown cardstock from my stash. The two photo mats are just 4.5x6.5 papers from an adhesive card pack I picked up at Hobby Lobby...I liked the zebra print and the brown houndstooth, as they fit the theme so well. The little animals came from Animal Kingdom, cut at 2".  I gave each one of them their own close-ups:


The giraffe, cut from Animal Kingdom at 2" from gold cardstock. I just used a gel pen for his nostrils and mouth, but then he needed to "pop", so I added Stickles for his spots (Stickles' Designer Series "Glitz" by Sue Weinberg and I think the color is called Sequins - thanks to Linda Kuniyoshi for this particular bottle of Stickles! You may be from Hawaii, but you're a Peach!!)  I also put him up on foam dots so he stands out a bit from the page.


Here is my little zebra; again, from Animal Kingdom at 2" from plain white cardstock. I used a gel pen for his ears, nose and mouth (I'm not THAT good with Stickles!), but had to make him pop with something... His stripes and mane are done with plain black glitter glue I found at Michael's in the $1 bins (Studio G, for those who wonder the names of this stuff...).  I also popped him on a foam dot to add a little pizzazz....


And, last but not least, isn't this rhino just the cutest thing???  He is also cut from Animal Kingdom at 2", this time from plain gray cardstock. Again, I used a gel pen for the ears and nose.  For the rhino's "pop," I decided to use some Liquid Pearls (White Opal) - again, thanks to Linda K for this! - for his horn.  Everyone knows rhinoceros horns are beautiful and envy-worthy, so I had to make his beautiful, too!  Mr. Rhino is also popped up on a foam dot for dimension.

And, there you have it. A scrapbook page that can be done in a flash!


Now, for my next project: the autograph book!  Well, a page for it, anyway.  If you were here for last month's hop, you saw that I am starting an autograph book for my son when/if we get to go back to Disney World.  Last month, I did Tigger, so this month I chose Pooh.  I used the Pooh and Friends cartridge.


The background pages are just 8x8 tan/cream cardstock from my stash. I want to keep them neutral, as the autograph is the main thing for these pages.  The word "Pooh" is cut from Pooh and Friends, each of 3 layers, cut at 2", from black, gold and red cardstock (traditional Winnie the Pooh colors).  Pooh himself was also cut out of black, gold and red cardstock but his layers were cut at 3".  With the Cricut, all of this layering is made so easy, you just would NOT believe it! Pooh, for example, has all of these little cuts that show you where all of the pieces go! Once you cut that bottom layer, you have a road map of sorts to show you where all the others go! Easy-peasy! (Well, unless you have an unsteady hand, as I do....then getting them to line up straight can be a pill, but....).  The photo mats for these pages are just 4.5x6.5 adhesive cardstock papers from a pad I bought at Hobby Lobby. The colors coordinate, but the patterns in them aren't too overwhelming, so one can be used for the autograph itself if we choose.  There is also room at the top near Pooh that can be used for the autograph if we decide we want two pictures, too... :)


And, now, for the final project in my Blog Hop Stash....


Candy Boxes!!!


OK; so, if you've been to my blog before, you know my cousin is getting married next month, and I have become a little obsessed with her color scheme of turquoise and orange. She had asked me about doing candy wrappers, but never mentioned it again, so I am not sure if she still wants me to make anything, but....these were a fun try to see what I could come up with. These are a perfect size to hold a small Hershey bar - the kind they have out for Halloween. I got the dimensions from a YouTube video of 2.5". This is the matchbox from pages 123-124 in the handbook of Tags, Bags, Boxes and More.  I cut the inner box from plain orange cardstock and the outer from turquoise cardstock.  After putting them together, they needed something to make them more personal, so I used Accent Essentials to cut the scallops - the orange one is cut at 1 3/8" and the white and its turquoise "border" are cut at 1 1/4".  I glued the turq border directly onto the white scallop, but then used a foam dot to pop it over the orange scallop for a dimensional look.  I also offset the two scallops so that more of the orange would show through.  The B monogram is from Gypsy Font and is cut at, I believe, 1/2" (I can't remember exactly - I had to play around with lots of sizes to find one that fit correctly) out of the same orange cardstock as the inner box.  The "ribbon" is a piece of orange cardstock that was punched with my new EK Success border punch. To get the ribbon effect, I just cut a 1/2" strip of orange cardstock and fed it through the punch, bit by bit. It makes the cutest little ribbon I've ever seen!


Well, that's it for this month!! Keep checking back weekly for more Cricut Craft Room DT fun!!!  Don't forget to comment, as Erica usually likes to give blog candy away randomly to those who comment on ALL the blogs in the hop! Thanks for hopping along with us, and I hope you have found some inspiration in some of my projects!!

Next up in the hop is the fabulously talented Connie!!!


In case you get lost, here is the entire lineup for the hop:

1.  My Cricut Craft Room http://mycricutcraftroom.blogspot.com