Sunday, July 31, 2011

My Cricut Craft Room's Theme Day Sunday - BIRTHDAYS

It's BIRTHDAY time over at My Cricut Craft Room!!!  If you've come from there, you're in the right spot. If not, please head on over to My Cricut Craft Room to see all the wonderful BIRTHDAY creations the Design Team has made!

Yesterday happened to be my sister-in-law's 30th birthday, so I made her a card to commemorate this wonderful occasion!  Her favorite colors are pink and black, so this is what I came up with:


I took a standard white 5x6.5 card from my stash and added the black and white paper from DCWV (The Glitter Stack 8x8 pad - found at Big Lots for just $7!).  The picture doesn't show it too well, but the spots have glitter on them. Then, I used Designers Calendar Cricut Cartridge for my "thirty" and "30" sentiments - cut at various sizes from 1" to 1.5" using hot pink cardstock from my stash and my Xyron 1.5" X Sticker Maker.  It wasn't quite "blingy" enough for my SIL, though, so I had to add some pink bling using the iRock - both of which I won from Erica (thank you sooo much - I now have a new favorite toy!). The "Happy Birthday" sentiment on the inside is from a set of stamps I got at Hobby Lobby and the ink is Bright Pink Stampabilities Dye Ink also from Hobby Lobby.


Thank you for stopping by; I hope you like what you see!!!  Don't forget to head over to My Cricut Craft Room to see all the BIRTHDAY creations that have been made today!!

Friday, July 29, 2011

My Cricut Craft Room's Christmas in July Blog Hop


Merry Christmas!!!!  I know, I know; it's not Christmas YET. However, it's never too early to get started on your shopping NOR is it ever too early to get started on your cards and gift tags and other handmade items!  For this reason, today is My Cricut Craft Room's Christmas in July Blog Hop, where we hope to give you plenty of inspiration for your handmade Christmas items!!

You should have come from the wonderfully talented Tammy; if not, please go back to My Cricut Craftroom and start at the beginning. Believe me, you're not going to want to miss ANYTHING!!

My big thing at Christmas is wrapping the gifts!!! I used to LOVE spending hours making sure the wrapping was just so, the ribbons so pretty....But, then LIFE happened and I just don't have time for all that anymore. My new favorite Christmas wrapping idea is GIFT BAGS!!!  They're so easy!! But, who says they have to be boring??  I love dressing up my gift bags with cute gift tags and now, thanks to My Cricut Craft Room and all the ladies that I have met through there, I know how to make some pretty cute gift tags, if I do say so myself!  I have two different ones to show you today. Remember, I'm all about simple yet cute, so either of these takes a very long time and can be turned out by the dozens fairly quickly.


This tag was made using Create a Critter (yes, Create a Critter!) and Tags, Bags, Boxes and More (TBBM).  I first cut the tag out of manila cardstock from my stash using the blackout feature of a basic tag from TBBM. I used my Gypsy to make the tag our standard Tag Swap size of 4.75" tall by 2.375" wide. Then I added a tree cut from Create a Critter (Accessory button on p. 33 in the handbook) that was cut at 1.47" high on my Gypsy (1.5" on your machine if you don't have a Gypsy) on green cardstock from the Creative Memories Shades of Green cardstock pack. 

Here, I have a confession to make: the tree was in my stash because, when I made the card for Card Creating Tuesday (see post below), I cut the trees too large.  But, so as not to be wasteful, I put the trees into my "scrap shapes" box and saved them for later.  See, WHOOPSIES don't always have to be a bad thing!!

Now, back to the tag. Once I added the tree, I wanted it to look like snow had fallen on it, so I added some Star Dust Stickles to the branches.  Then, I had to add the "To:" and "From:" which came from a little pack of acrylic stamps I picked up in the Michael's clearance bin some time ago using Tim Holtz Distress Inks Barn Door.  Lastly, I added an eyelet and some red and green raffia ribbon from my stash so I can tie the tag onto my gift!


I took a little poetic license with this tag, as our rules say our projects HAVE to include AT LEAST 1 Cricut cut. Well, the tag itself is my Cricut cut: I used the blackout feature of a standard tag from TBBM and cut it using my Gypsy at our standard Tag Swap size of 4.75" tall by 2.375" wide. I just used some light gray cardstock from my stash.  I then "dabbed" or "rubbed" some ink onto the background to give it a cloudy, chilly effect.  The color is Tumbled Glass from the Tim Holtz Distress Inks line (I'm absolutely LOVING these inks!!).  I then used the same color, Tumbled Glass, to stamp the snowflakes all around the tag using some more of my Michael's clearance bin Christmas acrylic stamps. And, of course, what gift tag is complete without "To:" and "From:" - same as the tag above, using Barn Door ink again - and an eyelet and ribbon for attaching to a gift?

I hope you have liked the Gift Tags I have created for you. As I said, I am all about quick and simple - yet cute! - so these can be turned out by the dozens! You could even add your own flair by embossing the snowflakes, or the to and from....the possibilities are endless!  Enjoy, and Mele Kalikimaka!!! (Hawaiian for Merry Christmas!)

Your next stop will be:  Melissa

Here is the whole line up in case you get lost:


Erica http://mycricutcraftroom.blogspot.com/2011/07/my-entry-for-christmas-in-july-blog-hop.html
Kat
http://katkscrapfever.blog​spot.com/


Tuesday, July 26, 2011

Card Creating Tuesdays

Today is Card Creating Tuesday over at My Cricut Craft Room! If you came from there, you are in the right spot. If not, head on over to My Cricut Craft Room to see all of the awesome cards we have in store for you today!

For today's project, I decided to do a Christmas Card.  Everyone talks about Christmas in July and I truly love Christmas, so this was a great pick-me-up for me!  Here is my card:


Front


Inside


And a collage so you can see all the cute little trees...(there are two different kinds of trees)


For this card, I used the Waterfall Card Tutorial from www.splitcoaststampers.com and made it with traditional Christmas colors: red and green, with a little brown thrown in! ;-)

The paper I used was Creative Memories (Shades of Red and Shades of Green) and then the brown was just some from a basic cardstock pack from Hobby Lobby.  The ribbon is red and green raffia ribbon I found in my mom's Christmas wrapping stash.  For the trees, I used Create A Critter (p. 33 - Accessory Key and its Shift Key). On my Gypsy, I placed 4 of each - the key and its Shift counterpart - at 1.09" and lined them up on the mat so I could cut 2 of each out of the two shades of green.  I also used my Gypsy to "Hide" the face that comes when using the Shift Key.  I then alternated my two different types of trees on the four blocks of the "waterfall" to finish off the card.  The sentiment inside is from a set of Christmas acrylic stamps I picked up on clearance at Michael's a couple of years ago, and the ink color is Barn Door from the Distress Inks line by Tim Holtz.

These cards only LOOK hard; they are truly easy-peasy and give fantastic results!  Thank you for looking, and don't forget to check out My Cricut Craft Room every day for different inspiration!

Thursday, July 14, 2011

Theme Day Thursday - DISNEY

It's Theme Day Thursday over at My Cricut Craft Room, and today's theme is:  DISNEY!!!!  If you came from My Cricut Craft Room, you are in the right spot. If not, be sure to go there to see all of today's fabulous creations!

For this, I made two projects.  As I have said before, my crafting style is SIMPLE.....the quicker and easier, the better!!  So, these are two very simple projects that anybody can re-create!

Project #1:


I love anything Disney, and I needed some new magnets for my bulletin boards here at home, so I decided to make some Mickey ones! I used my new iTop brad maker to cover the 22mm magnets with white and black cardstock (just basic from Hobby Lobby) and then adhered the little Mickey heads and gloves to them.  For these Mickey heads and gloves, I used the Mickey and Friends cartridge and cut them at 0.5" (truthfully, I used my Gypsy, so I think they were more like 0.6", but 0.5" will work, too).  Then, I adhered the white gloves to the black magnets and the black Mickey heads to the white magnets with regular adhesive.  The edges started pulling up since the magnet top is rounded, so I decided to Modge-Podge over the top to make sure they stay together for a long, long time!  Very quick and simple project that anyone with the right tools can make!  (Remember, you can always emboss and/or embellish to your own liking!)


Project #2:


For this project, I decided to start an Autograph Book for my little boy for when (if??) we get to go back to Disney World.  I used the Pooh and Friends cartridge for this project.  As Tigger is one of my favorite Disney characters (and not what you immediately think of when you think Disney), I started with him...  For the word "Tigger" I used the image on p. 26, the blackout feature and the Layer 2 set at 2.06" on my Gypsy. I cut the image on beige, the blackout on black and the Layer 2 on orange and layered it for depth using my Xyron 1.5" Create-A-Sticker and Zig 2-way glue pen.  Then, I cut Tigger's face (<tigger1> on p. 27) and all 4 of its layers and the blackout feature at 3.24" using beige, orange, two shades of pink and black for the different parts. I then layered everything according to the score marks to create Tigger's face using my Zig 2-way glue pen and placed the layers on the blackout image for stability.  For the page, I just placed my images over some patterned and solid photo mats on 8x8 green cardstock just to my liking.  The idea is to use the patterned mat for a photo and the plain for the autograph, but one could always use it as a 2-page layout in a regular scrapbook instead of as an autograph book page.


Thank you for looking, and I hope you have enjoyed our Theme Day Thursday look at fun Disney projects!

Monday, July 11, 2011

Thank You!!!!!

I just received my second blog award, this time from Amanda Haynes!!! Thank you so much, Amanda!!


Now, I am going to pass this wonderful award along to five other bloggers I think deserve it (and ones I visit quite frequently!)! Here they are, in no particular order:

Aman at Scrap Fix
Patricia at MI Crafty Gal

Check out all the blogs that have been mentioned (linked); I promise you will LOVE what you see!!

Congratulations, ladies, you TOTALLY deserve it!!  And, thanks again, Amanda!

Friday, July 8, 2011

Festive Fridays over in My Cricut Craft Room

Today in Erica's Cricut Craft Room, it is Festive Friday!!!!  Yep, you guessed it:  all holidays all day long!!! This could be Christmas, Halloween, Easter - any holiday!  If you didn't come from Erica's blog, please go back there so you don't miss any of today's wonderful creations!  If you did come from Erica's blog, then you are in the right spot, and I hope you enjoy what you see!


Christmas Caroler


First off, let me start by saying that I totally scraplifted this idea from my son's teacher at school, Mrs. Katie Hamilton.  She has some fun ideas for kid crafts that I just adore, so I figured out how to make it using the Cricut and here is what I came up with:  first, you paint a toilet paper roll (or a piece of a paper towel or wrapping paper tube - can be cut to varying heights if you want to make yourself a choir).  In this instance, I used Folk Art acrylic paint - it dried almost instantaneously! - in a Christmas-y green. For the caroler's face, I used Plantin Schoolbook (p. 72 <oval>) cut at 2" on flesh-colored cardstock and drew in the eyes, nose and mouth using a black gel pen.  I then used a little pink chalk to make the rosy cheeks.  For the caroler's hands, I used Christmas Cheer (p. 82 <santa-s>) and cut it at 8" on basic red cardstock.  (I used my Gypsy and hid all the parts of Santa other than the mittens so I didn't waste as much paper.)  Then, all you do is glue the face onto the toilet paper roll, print off a shrunken piece of Christmas music for the "book" and attach the hands to the music and then to the roll.  **PLEASE NOTE:  I tried this with scrapbook tape adhesive first and the parts fell off during the night. A liquid glue like Elmer's or even Alene's Tacky Glue works better**  For the hat, just attach a baby sock tied with a piece of yarn or ribbon for decoration.

Thank you for looking, and I hope you enjoy your Festive Friday!!

Wednesday, July 6, 2011

Would You Guess? Wednesdays

Today is Would You Guess? Wednesday over at My Cricut Craft Room....you should have come from there. If not, please head back over there and you won't miss out on any of the fun things Erica and her Design Team have come up with!

As my first "official" Design Team Daily Project, I have created this lovely tag that can be used for a variety of purposes: gift-giving, scrapbooking, mini-albums - the possibilities are endless!!!  And, this tag is so simple, and the colors so easily changed and coordinated, that it can match ANY project you can come up with!


Here's my tag :)


For this tag, I used only the Feature Keys on Damask Decor (p. 25)  and it is cut at our standard Swap size of 4.75" x 2.375" (I used my Gypsy, which allows me to be very specific in my sizes when I want to) on basic powder blue and brown cardstock that can be obtained at any craft store (the blue is from Hobby Lobby and the brown is from a Creative Memories pack called Shades of Brown).  The ribbon is just plain 1/8" wide satin ribbon from Wal Mart (a 10-yard roll is $0.47 so it's super-affordable for these little projects!) in brown and powder blue.

(((For those who were guessing the cartridge earlier, those who guessed Damask Decor were correct!! LOL  I wasn't sure if Erica was posting the carts or not, but now that I know she did, I went ahead and changed the post to show the particular page I used)))

 
Thank you for looking, and I hope you enjoy all of our Design Team projects!

Saturday, July 2, 2011

My Cricut Craft Room's Surprise 100 Cartridge Blog Hop

Hi! And welcome to the Surprise Blog Hop hosted by Erica at My Cricut Craft Room! You should have come from the lovely and talented Amanda Hernandez. If not, please hop on over to Erica's Blog to start at the beginning of the hop.

For this hop, we were to go on the themes of Wedding/Love/Family/Baby.  Since it IS Erica's wedding day, I stuck with the Wedding theme and created a 2-page Layout for her wedding scrapbook (I used Erica's wedding color scheme to create this page - lilac and powder blue):


Both Pages


Left Page


Right Page


For this layout, I used textured black cardstock for the background and plain lilac and powder blue cardstock for the photo mats.  On the left page, the photo mats are for 4x6 photos (lilac cut at 5 1/2" x 7 1/2" and blue cut at 5x7) and on the right page, the photo mat is for a 5x7 photo (lilac cut at 6 1/2" x 8 1/2" and blue cut at 6x8).  I am assuming using the two smaller mats for ceremony pictures of the ring exchange and the larger one for the traditional "hands on the bouquet to show off the rings" photo.

For the rings, I used metallic cardstock from Target (Wasau Paper's Creative Collection) and the Everyday Pop Up Cards Cricut Cartridge (p. 54).  I cut the main layer of the rings at 1 3/4" out of the white metallic cardstock and the shift layer also at 1 3/4" out of silver metallic cardstock.  I then layered the silver over the white to create the completed rings.  For the words, "With This Ring... ...I Thee Wed," I used Gypsy Font cut at 1" and welded using my Gypsy handheld design studio on the same silver metallic cardstock as the rings.

As for my other project, I decided to make something that no wedding these days is complete without:  monograms!  I have a cousin who is getting married in October and, of course, Erica is getting married today, so I created monograms for them both, using their color schemes (lilac and powder blue for Erica and sea blue and orange for my cousin).
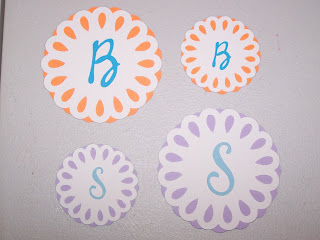


These monograms were created using the Elegant Edges Cricut Cartridge (Citrus1 on p. 64).  I cut the main image at both 2" and 3" on textured white cardstock and the shift image at 2" and 3" on orange cardstock and lilac cardstock.  I then cut the letters out of powder blue and sea blue cardstock at 0.75" and 1.25" using the Gypsy Font Gypsy Cartridge.  Instead of mounting the back colored piece "in line" with the white cover piece, I decided to let more of the color show by offsetting the two a little.  I used my Xyron Create A Sticker to adhere the letters to the center, and, VOILA! Monograms to be used in so many ways for a wedding: invitations, place cards, thank you gifts, etc.

So, a big CONGRATULATIONS to the newly-married Mr. and Mrs. Smole, and their precious little girl, Bella!! May God richly bless you and your wonderful family!

Thank you for looking; your feedback is always welcome! Please feel free to comment and/or become a follower if you like what you see!

The next stop along the way is: 


If you get lost, here is the complete line-up for today's hop:

1. My Cricut Craft Room http://mycricutcraftroom.blogspot.com/
2. Alishia Gaff http://alishia-myscrapping.blogspot.com/
3 Amanda Haynes http://craftsbyamanda.blogspot.com/
4. Amanda Hernandez http://mandyscandywrappers.blogspot.com/
5 Autumn Johnson Willis http://autumnsbuggycreations.blogspot.com/
6 Charlotte Simpson Cornett http://charlottes-creations.blogspot.com/
7 Connie Benford Layman http://conniescraftycloset.blogspot.com/
8. Courtney Larson http://craftingwithcourtney.blogspot.com/
9. Gayle Shrader http://gscraptime.blogspot.com/
10. Heather Flaherty http://www.papercrafteranonymous.com/.
11 Heather Hammen Sipes http://operationcricutdesign.blogspot.com/.
11 Jamie Lindstrom (Scrapbookingprincess Jamie) http://myamusinglife.blogspot.com/
13. Jen Roseman http://memorieswithjen.blogspot.com/.
14 Jennifer Rethorn Lundy http://mybusycraftylife.blogspot.com/.
15 Julie Davis-Perez http://designs-by-julie.blogspot.com/
16. Justina Almanza http://justmycrafts.blogspot.com/
17. Kathleen Schriber http://katscrapfever.blogspot.com/.
18 Kassidy Thomas http://inkingitupcrazy.blogspot.com/.
19 Lezlye Lauterbach-Hardwick http://lezlyes.blogspot.com/
20 Mayra Alonso http://gettingcraftywithma.blogspot.com/.
21 Linda Kuniyoshi http://simpleandsassycreations.blogspot.com/.
22 Lucinda Gibson http://thegrowinggibson.blogspot.com/
23 Michelle Hull http://craftychelle.blogspot.com/
24 Nina Wilson http://nina-hotpinkscrapper.blogspot.com/
25. Patricia Holloway http://micraftygal.blogspot.com/
26. Ricki Sholler Tidd http://manicexpressionsdesigns.blogspot.com/.
27 Rosa Kleyman http://kleymanr.blogspot.com/
28. Scrappin Dhilly http://scrappindhilly.blogspot.com/.
29 Sue-Ann Lovell http://suzyssimplecrafts.blogspot.com/.
30 Tammy Androsky http://crazycardcreator.blogspot.com/
31. Terry Meyers http://cricutcraftinterry.blogspot.com/
32. Tina Ondrus Keller http://craftyandgreen.blogspot.com/.
33 BLOG CANDYReport · 10:13pm