For today, I made two very simple cards using Damask Decor. Who knew a card called "Damask Decor" would have holiday cards built right in???? By the way, these can be "dressed up" in any way you can think of.....I am just not that great at the "dressing up" of it all, so I did what I could with the papers and all that I chose...
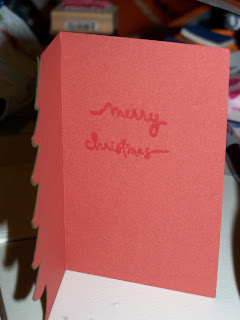
My first card is a Christmas card....it uses the tree card and layer from p. 70 of the handbook. I cut both at 4.65" (I use my Gypsy for everything, so you can use just the cart in your machine at 4.5" or 4.75"). For the card, I used a burgundy cardstock and the tree is a dark olive green. Both of these are just plain cardstock from my stash. My mind's eye tells me that the tree needs some "decorating" but I am at a loss right now as to how....maybe you guys can help! Comment away on how I can "decorate" my Christmas tree!! The inside is stamped with a little "Merry Christmas" sentiment I've had on hand for years and the ink is Tim Holtz Distress Ink in Barn Door (I liked the kind of watermark effect it had).
My next card is a Halloween card, or could just be done as a fall card. :) Again, I used Damask Decor, the Pumpkin card feature and its layer - page 68 in the handbook. I cut both of these at 4.41" (again, using the Gypsy...if you're using just the machine and cartridge, you can use 4.5"). The card base is just basic black cardstock from my stash and the pumpkin is an orange metallic cardstock from a package that I picked up at Target a few years ago. I believe the paper company is Wasau Paper. For the inside of the card, I decided to try something I've been a little hesitant to try: embossing!!! OK; so it didn't turn out quite like I wanted it to, but at least I tried something new! The sentiment is a stamp I picked up on a clearance aisle a long time ago, and I used Stampendous! embossing powder called Star Dust - a lovely gift from Erica of My Cricut Craft Room herself (THANKS!!). Note to self: if the embossing powder says "Transparent," you need to use a color underneath it if you want it to really show up on black. LOL I probably should have stamped it in white before I embossed, but I tried just the embossing powder alone. Not too terrible, but not too visible, either. Oh, well, you live and learn, right??? Without any further adieu, here is the Pumpkin Card:
I hope you've enjoyed my creations today; keep checking back, as we have projects going on ALL the time!!! Also, remember to check My Cricut Craft Room daily, as she has new things going EVERY DAY!!!! (PPPPSSSSTTTT: she's also very fond of giveaways, so be sure to watch for those!)
Have a fantastic day, and remember to stay crafty!


7 comments:
Beautiful cards Autumn! I am sooo going to have to get this cart! Looks fun! TFS!
Your cards are great, though I am not looking towards christmas yet.. HA HA! I love the Pumpkin card
Ha love this cartridge it is one of my favorites. Love your personality ..I learn a lot too something new everyday! You did a great job!
Wonderful seasonal cards...looks like you are getting a jump start on the holidays! Love the shimmer paper on the pumpkin...great touch!
Ooh, I love the shiny paper. The more I see from this cart I know it is one to be added to the wish list. Great festive cards! TFS
Beautiful cards!! Now I want this cart too!! :)
♥ Laura ♥
tweetyb@satx.rr.com
http://laurascraftsandmore.blogspot.com/
Such pretty cards:) Now I want to start making Christmas cards!! Thanks for sharing!!!
~Madison funkycards.blogspot.com
Post a Comment